Open the image. You'll start by opening the sample file.
1 Click File > Open.
2 From the Files of type list box, choose TIF - TIFF Bitmap.
3 Choose the folder Program files\Corel\Corel Graphics X4\Tutorial files.
4 Double-click the filename start.tif.
Straighten and crop the image. The scanned image is slightly askew. You will use the Straighten image command to align the image.

1 Click Adjust > Straighten image.
2 In the Straighten Image dialog box, move the Rotate image slider to 5°.
You can also type 5 in the box.
3 Click OK.
The image is aligned and cropped. This is what the image should look like:

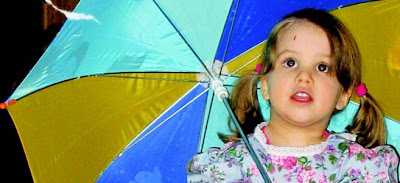
Remove red-eye. Now, you’ll use the Red-eye removal tool to remove the redness from the girl’s eyes. Red-eye occurs when light from a flash reflects off the back of the eye.
1 In the toolbox, click the Red-eye removal tool.
2 From the Nib shape picker on the property bar, choose the third brush in the top row.
3 In the Size box , type 30.
4 From the Tolerance drop-down list, choose 3.
5 Click in the red area of each of the girl’s eyes, and dab with the brush to remove the red color.
Note: If you want to take a closer look at the image, choose the Zoom tool from the toolbox. Click an area of the image to zoom in; right-click to zoom out.
This is what the image should look like:

Touch up the image. You can remove imperfections, such as tears, scratch marks, and wrinkles, from an image by blending its textures and colors. You choose the range of pixels necessary to retouch the image, depending on the size of the correction and the area surrounding it.
Now, you’ll use the Touch-up brush tool to remove the scratch from the girl’s forehead.
1 In the toolbox, click the Touch-up brush tool .
2 From the Nib shape picker on the property bar, choose the third brush in the top row.
3 In the Size box , type 20 to specify the nib size.
4 From the Strength box , choose Medium to set the intensity of the effect.
5 Dab the brush on the scratched area on the forehead.
This is what the image should look like:

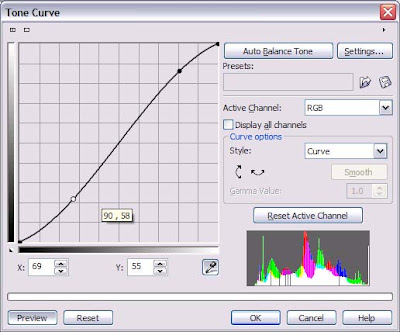
Adjust image color and tone. Corel PHOTO-PAINT provides you with a tone curve and histogram to help you make adjustments to the color and tone of images. In the following procedure, you will adjust the image’s color and tone by using the Tone Curve dialog box.
1 Click Adjust > Tone curve.
2 In the Tone curve dialog box, click the Eyedropper tool , and click in the image on the girl’s tooth to select a white point.
3 Click in the image on the dark color at the bottom of the left pigtail to select a black point.
Two nodes appear on the tone curve.
4 Drag the top node to the left to adjust the highlights in the image.
As you drag the node to the left, the histogram in the Tone curve dialog box shifts to the right. If you move the node too far to the left, you will lose highlights in the image.
5 Drag the bottom node to the right to adjust the shadows in the image.
As you drag the node to the right, the histogram shifts to the left. If you move the node too far to the right, you will lose shadow detail in the image.

For best results, your tone curve should resemble the example above.
6 Click OK.
This is what the image should look like:

Remove the tear. Now you will remove the tear in the photo by using the Clone tool. The Clone tool consists of two brushes:
a source point brush and a clone brush that applies the copied pixels from the source point.
1 In the toolbox, click the Clone tool.
2 On the property bar, choose the Round nib shape.
3 In the Size box, type 30.
4 On the property bar, click the Open advanced options button.
5 In the Feather box , type 25.
6 Click near the tear to create a source point.
A cross-hair displays in the source point brush to distinguish it from the clone brush.
7 Click on the tear (as shown by the second circle in the image below) to set the clone brush.

8 Drag along the tear to remove it.
Once you set the source point and the clone brush, they move together, so that the source point brush samples pixels continuously as it moves across the image.

9 To reset the source point, right-click where you want to place the crosshair, then left-click and drag to clone pixels.
This is what the final image should look like:

Save to a new file format. Corel PHOTO-PAINT offers a wide variety of file formats. The sample image is a scanned photo saved as a TIFF file.
If you want to e-mail an image, you probably want to change the file format in order to reduce the file size.
You'll save the sample image in the JPEG format.
1. Click File > Save as.
2. From the Files of type list box, choose JPG - JPEG bitmaps.
3. From the Save in list box, choose the drive and folder where you want to save the file.
4. Click Save.
5. In the JPEG export dialog box, drag inside the
Original preview window to view other parts of the image and compare them with the image in the Result preview window.
6. Move the Compression slider to change the file size, which is displayed in the lower-right corner of the dialog box.
A higher compression number results in a smaller file size but decreases image quality.
7. Set any other options you want.
8. Click OK.


